> ## Documentation Index
> Fetch the complete documentation index at: https://docs.guin.ai/llms.txt
> Use this file to discover all available pages before exploring further.
# Edit with the Director in the Smart Editor
> Make one video or refine a clip: ask the Director for changes in plain words, approve its plan, and fine-tune on the timeline.
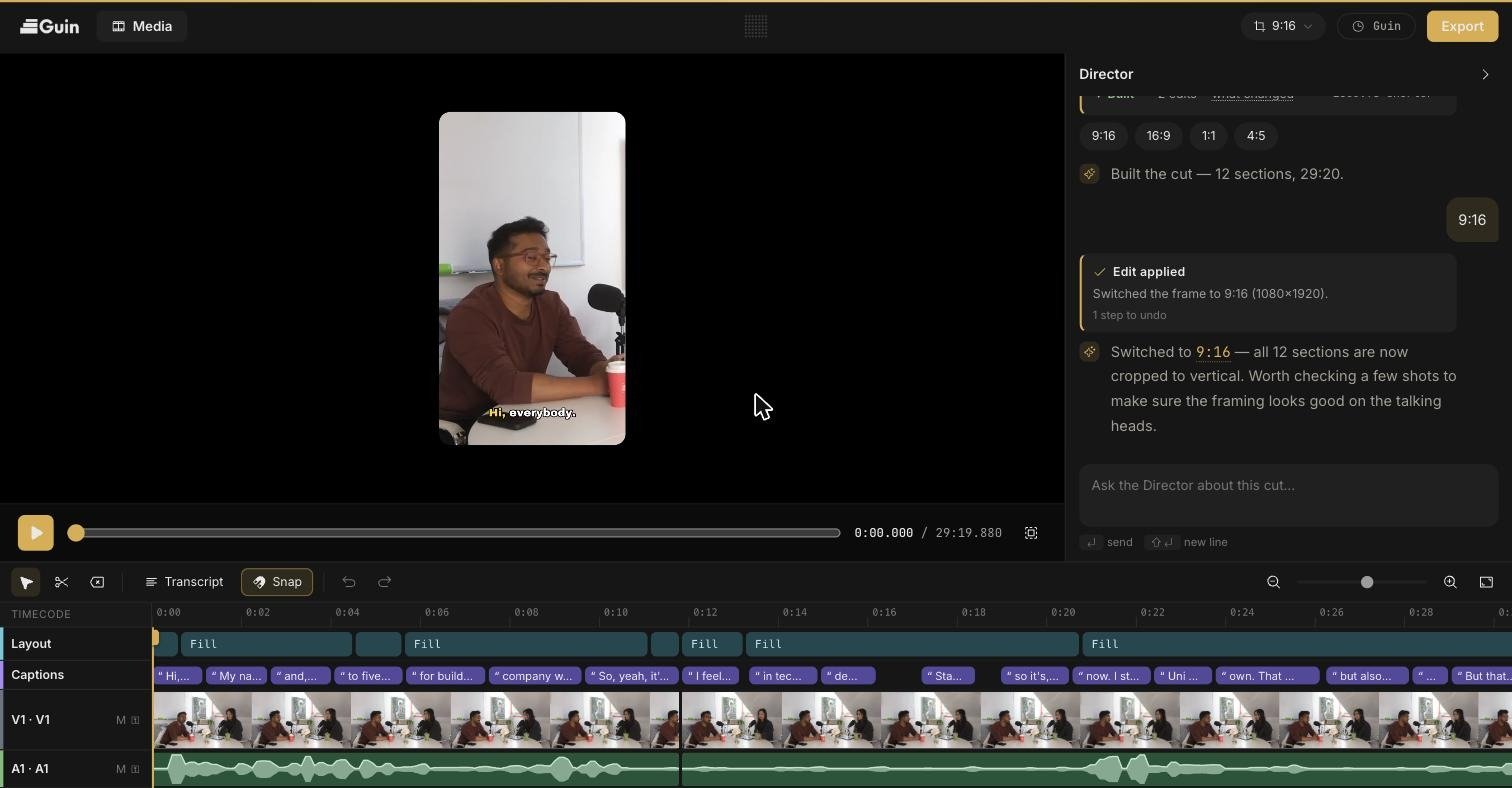
The Smart Editor is best for making one video and for precise changes. It puts a timeline, a preview, and the **Director** side by side. The Director is a chat co-editor that can search your footage, look at the cut, and make edits for you. Anything it changes, you can undo.
 ## Start a video
Click **Editor** in the sidebar, or the **Smart Editor** card on Home.
Click **Upload**, drag files onto the page, or pick from **Media library**.
For example: `a 45s cut of the interview, captions on`. The chips under the box (**A tight 60s cut**, **Cut the silences**, **Captions on**, **Hook first**) cover common starting points.
The Director reads the footage for a story and replies with a **Proposed cut**. Click **Approve & build** to have it assemble the timeline, or reply to change the plan first.
## Ask for changes
Type in the **Ask the Director about this cut…** box. The Director tells you what it is doing as it works, such as *Searching the transcript…*, *Looking at the footage…*, or *Tightening the pauses…*, and finishes with an **Edit applied** card that says what changed.
Things the Director can do:
| Ask for | Example |
| -------------------------- | ------------------------------------------------------------- |
| A new cut or a restructure | `Open with the strongest line, then the backstory` |
| Tighter pacing | `Cut the silences` or `Take out the filler words` |
| Keeping or removing parts | `Drop the section about pricing` |
| A different canvas | `Make it 9:16` |
| Captions | `Captions on, bold style` or `Make the captions smaller` |
| Reframing | `Keep her centred in the wide shot` |
| B-roll over a section | `Cover the part about the workshop with the workshop footage` |
| Volume | `Bring his audio up a little` |
| Finding a moment | `Where does he talk about the first customer?` |
B-roll is added by asking the Director. There is no button for it on the timeline.
When the Director refers to a moment, its reply includes **Jump to this moment** and **Play this moment** so you can check it against the footage.
## Work on the timeline yourself
The timeline has a **Layout** track, a **Captions** track, your video, and your audio. The toolbar above it has the tools.
| Tool | Shortcut | What it does |
| ----------------- | ------------ | ----------------------------------------------------------------------------- |
| **Select** | `V` | Select and move items. Drag the ends of a clip to trim it. |
| **Blade** | `B` | Click anywhere on the timeline, or on a word in the transcript, to cut there. |
| **Ripple delete** | `⌫` | Click a clip, audio block, or caption to delete it and close the gap. |
| **Transcript** | | Show or hide the transcript panel. |
| **Snap** | `S` | Turn snapping on or off. |
| **Undo / Redo** | `⌘Z` / `⇧⌘Z` | Step back or forward through every change, including the Director's. |
Right-click on the timeline and choose **Restore removed footage** to bring back what was cut out at that point.
Select an audio clip to set its **Volume** in the panel on the left. Double-click the slider to reset it.
## Use the transcript
Click **Transcript** to open a word-by-word transcript beside the preview. It follows playback and highlights the current word.
## Start a video
Click **Editor** in the sidebar, or the **Smart Editor** card on Home.
Click **Upload**, drag files onto the page, or pick from **Media library**.
For example: `a 45s cut of the interview, captions on`. The chips under the box (**A tight 60s cut**, **Cut the silences**, **Captions on**, **Hook first**) cover common starting points.
The Director reads the footage for a story and replies with a **Proposed cut**. Click **Approve & build** to have it assemble the timeline, or reply to change the plan first.
## Ask for changes
Type in the **Ask the Director about this cut…** box. The Director tells you what it is doing as it works, such as *Searching the transcript…*, *Looking at the footage…*, or *Tightening the pauses…*, and finishes with an **Edit applied** card that says what changed.
Things the Director can do:
| Ask for | Example |
| -------------------------- | ------------------------------------------------------------- |
| A new cut or a restructure | `Open with the strongest line, then the backstory` |
| Tighter pacing | `Cut the silences` or `Take out the filler words` |
| Keeping or removing parts | `Drop the section about pricing` |
| A different canvas | `Make it 9:16` |
| Captions | `Captions on, bold style` or `Make the captions smaller` |
| Reframing | `Keep her centred in the wide shot` |
| B-roll over a section | `Cover the part about the workshop with the workshop footage` |
| Volume | `Bring his audio up a little` |
| Finding a moment | `Where does he talk about the first customer?` |
B-roll is added by asking the Director. There is no button for it on the timeline.
When the Director refers to a moment, its reply includes **Jump to this moment** and **Play this moment** so you can check it against the footage.
## Work on the timeline yourself
The timeline has a **Layout** track, a **Captions** track, your video, and your audio. The toolbar above it has the tools.
| Tool | Shortcut | What it does |
| ----------------- | ------------ | ----------------------------------------------------------------------------- |
| **Select** | `V` | Select and move items. Drag the ends of a clip to trim it. |
| **Blade** | `B` | Click anywhere on the timeline, or on a word in the transcript, to cut there. |
| **Ripple delete** | `⌫` | Click a clip, audio block, or caption to delete it and close the gap. |
| **Transcript** | | Show or hide the transcript panel. |
| **Snap** | `S` | Turn snapping on or off. |
| **Undo / Redo** | `⌘Z` / `⇧⌘Z` | Step back or forward through every change, including the Director's. |
Right-click on the timeline and choose **Restore removed footage** to bring back what was cut out at that point.
Select an audio clip to set its **Volume** in the panel on the left. Double-click the slider to reset it.
## Use the transcript
Click **Transcript** to open a word-by-word transcript beside the preview. It follows playback and highlights the current word.
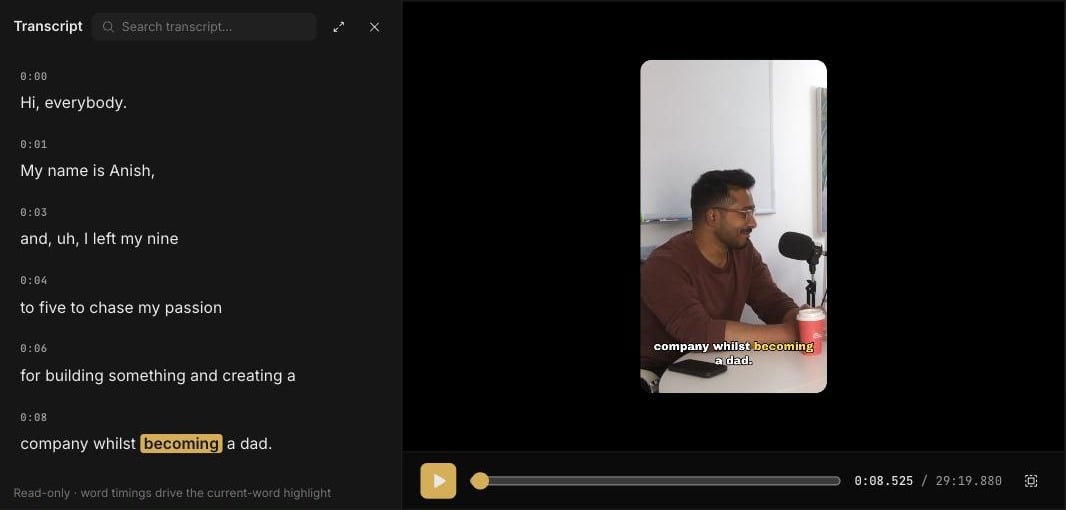 * Click any word to jump the playhead there.
* Use **Search transcript…** to find where something was said.
* With the **Blade** tool selected, click a word to cut the timeline at that word.
The transcript is read-only. To remove what someone said, cut around it with the Blade, or ask the Director.
## Change the canvas
The canvas menu in the top bar sets the shape of the video: **9:16**, **16:9**, **1:1**, or **4:5**. Guin reframes every shot when you switch. See [Auto-frame and layouts](/features/auto-frame).
Your work saves as you go. The top bar shows **Saving…** and then **All changes saved**.
## Next steps
Styles, fonts, colours, and position.
Render a video file or hand the project to another editor.
* Click any word to jump the playhead there.
* Use **Search transcript…** to find where something was said.
* With the **Blade** tool selected, click a word to cut the timeline at that word.
The transcript is read-only. To remove what someone said, cut around it with the Blade, or ask the Director.
## Change the canvas
The canvas menu in the top bar sets the shape of the video: **9:16**, **16:9**, **1:1**, or **4:5**. Guin reframes every shot when you switch. See [Auto-frame and layouts](/features/auto-frame).
Your work saves as you go. The top bar shows **Saving…** and then **All changes saved**.
## Next steps
Styles, fonts, colours, and position.
Render a video file or hand the project to another editor.